
RV Oxidation Removal: How Detail Genius Restores Years of Fading, Chalkiness & Lost Gloss
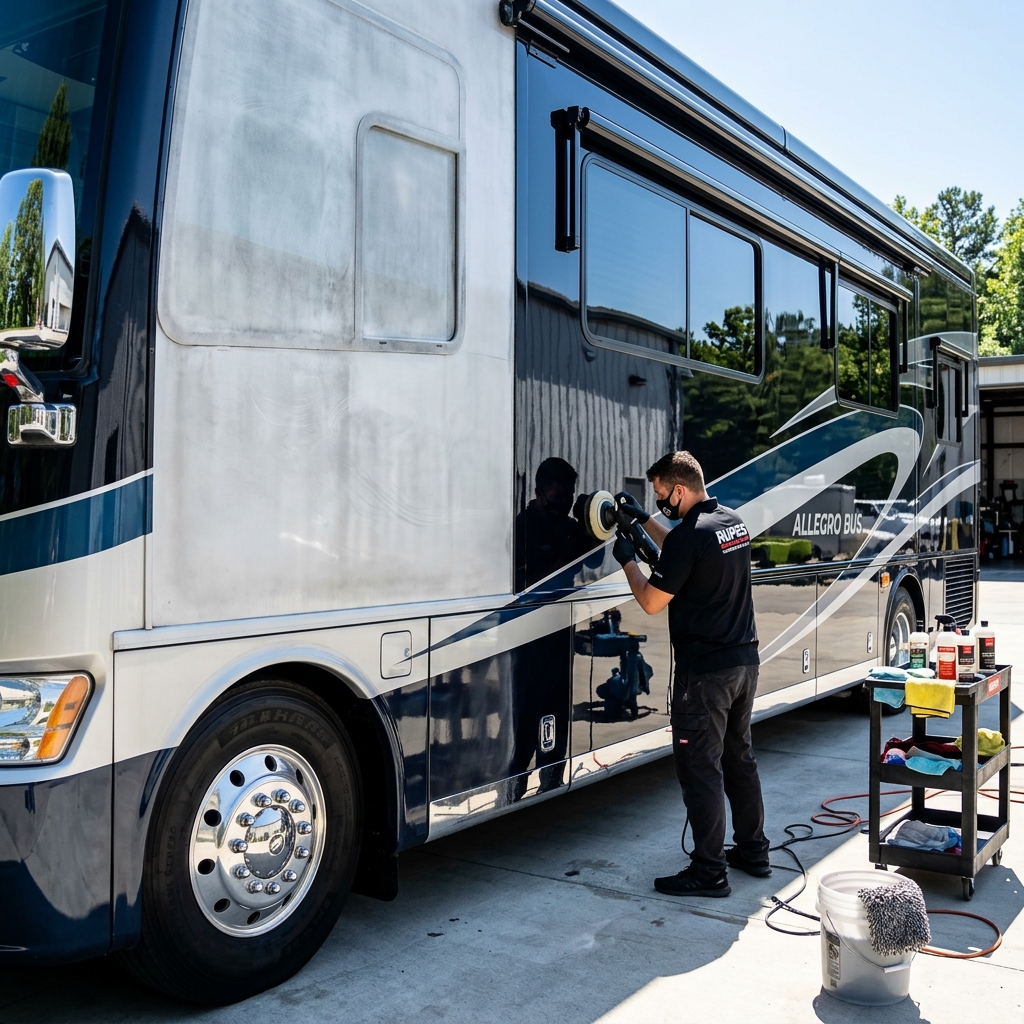
RV Oxidation Removal: How We Restore Years of Fading and Bring Back the Gloss
If your RV once had a deep, glossy finish but now looks faded, cloudy, chalky, or dull, there is a good chance oxidation is the problem.
Oxidation is one of the most common exterior problems we encounter during RV detailing. RVs spend enormous amounts of time exposed to sunlight, heat, rain, road grime, environmental contamination, and changing weather conditions. Over the years, that exposure can dramatically change the appearance of the exterior.
A surface that was once rich and glossy can gradually become pale and lifeless. Dark colors can lose their depth. Graphics and surrounding surfaces may no longer look crisp. Instead of reflecting light cleanly, the exterior scatters it and takes on the familiar dull, chalky appearance associated with severe oxidation.
At Detail Genius, our RV oxidation removal process is not a quick wax or a single trip around the RV with a buffer. Correcting years of oxidation requires time, patience, professional equipment, the right combination of compound and pads, and—most importantly—a controlled process.
On heavily oxidized RVs, we may spend up to 50 man-hours correcting, polishing, and protecting the exterior.
The goal is simple: remove as much correctable oxidation as the surface safely allows, restore the RV's natural color depth and gloss, refine the finish, and then protect that restored surface so the results last.
What Is RV Oxidation?
Oxidation is the deterioration that occurs as an RV's exterior surface is repeatedly exposed to oxygen, ultraviolet radiation, heat, moisture, and environmental contamination.
Depending on the RV, the exterior may include painted surfaces, gel coat, fiberglass components, graphics, decals, plastic trim, and other materials. These surfaces do not all age in exactly the same way, which is one reason professional RV detailing requires careful inspection before correction begins.
One of the easiest ways to recognize oxidation is by appearance.
Common signs include:
- A chalky or powdery-looking finish
- Faded or washed-out colors
- Dramatically reduced gloss
- Cloudiness or haze
- Uneven reflections
- A finish that still looks dull immediately after washing
- White or light-colored residue transferring to a towel in some cases
- Areas that look noticeably worse on the sides receiving the most sun exposure
Washing removes dirt sitting on the surface. Oxidation removal is a correction process. The damaged and weathered surface must be mechanically refined before the underlying color and gloss can properly return.
Why Washing and Waxing Alone Usually Won't Fix Severe Oxidation
A thorough wash is essential, but washing alone does not remove years of oxidation.
Likewise, waxes and gloss-enhancing products can temporarily make an oxidized RV look somewhat better, but they do not necessarily correct the damaged surface underneath.
Think of the process in layers:
- Washing removes loose dirt and contamination.
- Compounding performs the heavy correction needed to remove oxidation and weathered material.
- Polishing refines the corrected surface and improves clarity and gloss.
- Protection helps preserve the newly restored finish.
Skipping the correction stage is one reason some oxidation treatments look impressive for a short period and then quickly return to a dull appearance.
Detail Genius focuses on actually correcting the surface before protection is applied.
Our RV Oxidation Removal Process
Every RV is different, and the exact correction process depends on the material, condition, age, previous repairs, graphics, and severity of oxidation. However, the basic approach we use on suitable surfaces follows a highly controlled process.
Step 1: Thoroughly Wash the RV
Every oxidation-removal job begins with a thorough exterior wash.
There is no reason to start machine correction while dirt, road film, dust, insects, or other loose contamination is still sitting on the RV. That contamination can interfere with the correction process and may create additional defects when trapped between a polishing pad and the surface.
We carefully clean the exterior so we can evaluate what is actually happening underneath the dirt.
Once clean, the severity of the oxidation becomes much easier to see.
This is also an important part of professional RV detailing because what initially looks like simple dirt or staining may actually be oxidation, staining within the surface, clear-coat failure, damaged gel coat, deteriorating graphics, or another condition requiring a different approach.
Step 2: Inspect and Test the Surface
Before attacking an entire motorhome with an aggressive correction process, we evaluate the surface and determine how it responds.
Not every faded surface can—or should—be treated exactly the same way.
We are looking for factors such as:
- Severity of oxidation
- Surface type
- Existing gloss level
- Previous paint or body repairs
- Thin or compromised areas
- Failing clear coat
- Damaged graphics or decals
- Areas requiring a less aggressive approach
- The number of correction passes necessary to achieve a meaningful improvement
A test area helps establish the correction method before that process is repeated across hundreds of square feet of RV exterior.
Step 3: Compound the RV in Small 18 x 24-Inch Sections
This is where the major transformation begins.
For heavy oxidation removal, we use professional correction products and equipment, including Meguiar's M110 Mirror Glaze Ultra Pro Speed Compound, a Maxshine dual-action polisher, and wool cutting pads.
Meguiar's describes M110 as a professional-grade, heavy-cut compound designed to provide fast, even cutting while producing a high-gloss finish. It is compatible with dual-action and rotary machines. Product information: Meguiar's M110 Ultra Pro Speed Compound
Maxshine offers dual-action polishing machines designed for machine correction work. Equipment information: Maxshine Dual Action Polishers
For the cutting stage, wool provides the correction ability needed for significant oxidation. Maxshine's natural wool cutting pads are specifically intended for aggressive correction, including oxidation removal. Pad information: Maxshine Wool Cutting Pads
Why We Work in Approximately 18 x 24-Inch Areas
One of the biggest mistakes people make when attempting RV oxidation removal is trying to work too large of an area at once.
An RV is enormous compared with a passenger vehicle. Because of that, there is a natural temptation to spread compound over a large panel and move the machine quickly across it.
That may feel faster.
In our experience, it often produces a worse result.
We intentionally break the RV into small working sections—approximately 18 x 24 inches at a time.
That smaller working area allows us to:
- Maintain consistent pad contact
- Properly work the compound
- Control machine speed and movement
- Maintain overlapping passes
- Closely monitor the correction
- Inspect the surface before moving forward
- Repeat additional passes exactly where they are needed
The goal isn't to see how quickly we can move a buffer around an RV.
The goal is to create a consistent finish.
Step 4: Make Multiple Controlled Passes
We do not simply apply compound, make one quick pass, wipe it off, and declare the oxidation removed.
Within each small section, we make multiple overlapping machine passes.
The polisher, wool pad, compound, machine movement, pressure, and working time all contribute to the correction taking place.
After working the section, we remove the residue and inspect it.
If oxidation remains and the surface can safely tolerate additional correction, we repeat the process.
Then we inspect it again.
On heavily oxidized RVs, this cycle may be repeated several times before we achieve the level of correction we are looking for.
Compound. Work the section. Inspect. Repeat when necessary.
That repetition is one of the biggest differences between a quick "buff and wax" and a true oxidation-restoration service.
Step 5: Repeat Until the Oxidation Is Corrected
Some sections respond quickly.
Others don't.
The side of an RV that has spent years facing direct sunlight may require substantially more work than a protected area. Upper sections can weather differently from lower panels. Different materials and previous repairs can also respond differently.
Instead of assuming every square foot needs exactly the same number of passes, we inspect the surface as we go.
When another correction cycle is required, we perform another cycle.
This is why severe RV oxidation removal is labor intensive.
There is no shortcut that replaces the physical correction process.
Why Large Working Areas Create Streaks and Blemishes
Working too large of an area is one of the most common mistakes we see in DIY oxidation removal.
When too much surface is attacked at once, several problems can occur:
- Compound may not be worked consistently.
- The pad spends insufficient time correcting each portion of the surface.
- Machine passes become inconsistent.
- Some areas receive more correction than others.
- Residue can become harder to manage.
- The operator may miss partially corrected areas.
- The final finish can look streaky, cloudy, patchy, or blemished.
This becomes especially obvious on the huge flat sides of a motorhome.
From a few feet away, the surface may initially look improved. Step back and view the entire side in changing light, however, and inconsistent machine work can reveal itself as visible streaks and uneven gloss.
Our small-section approach is slower, but it gives us much greater control.
When we finish one 18 x 24-inch section, we want it properly corrected before progressing across the rest of the RV.
Then we overlap into the next section and repeat the process.
Over and over.
Across the entire vehicle.
Step 6: Polish the Corrected Surface
Heavy compounding is primarily about cutting and correction.
Once the oxidation has been removed to the appropriate level, we move into the polishing stage.
Polishing refines the finish after the more aggressive correction process. It helps maximize:
- Surface clarity
- Color depth
- Reflection
- Gloss
- Uniformity
This step matters because our goal isn't merely to make the RV "less oxidized."
We want to restore as much of the natural appearance as the condition of the surface allows.
A properly corrected and polished surface can look dramatically deeper and richer than the faded finish we started with.
Step 7: Repeat the Process Across the Entire RV
This is the part that explains why professional RV restoration can require so much labor.
A motorhome may have hundreds of square feet of exterior surface.
Now imagine correcting that exterior in roughly 18 x 24-inch sections.
Each section may require:
- Compound application
- Multiple overlapping machine passes
- Residue removal
- Inspection
- Another correction cycle
- Additional inspection
- Final refinement
- Polishing
Then the technician moves over approximately two feet and starts again.
By the time we have worked around a large RV, the project can represent dozens of hours of hands-on correction.
On severe restorations, Detail Genius may invest up to 50 man-hours into the process.
That time is spent restoring consistency—not racing a buffer around the vehicle.
Step 8: Protect the Restored RV With Ethos Graphene Ceramic Coating
Once the oxidation has been corrected and the exterior has been polished, leaving the newly restored surface unprotected would make little sense.
The final stage of our process is protection.
Detail Genius applies an Ethos graphene ceramic coating to the corrected surface. Ethos' own preparation guidance calls for cleaning, decontamination, and correcting defects such as oxidation before its Graphene Matrix coating is installed.
For our RV oxidation-restoration packages, we use the coating to help preserve the corrected finish and reduce the exposure that contributes to rapid deterioration.
Our service goal is to help keep oxidation from returning for at least 12–18 months, assuming normal environmental exposure and appropriate maintenance. Actual durability can vary based on storage, sun exposure, washing methods, climate, surface condition, and maintenance.
The coating also makes ongoing exterior maintenance easier because contamination has a protected surface to land on rather than an unprotected, freshly corrected finish.
Why Ceramic Coating Comes After Oxidation Removal
A ceramic coating should not be viewed as a substitute for surface correction.
If an RV is severely oxidized, applying a coating directly over the neglected surface does not magically restore the lost color and gloss underneath.
Preparation is critical.
The proper order is:
Clean → Correct → Polish → Prepare → Protect
Correction restores the appearance.
Protection helps preserve it.
This is why we spend the overwhelming majority of the labor on preparation and correction before the coating bottle ever comes out.
How Much Improvement Can RV Oxidation Removal Make?
The potential improvement can be dramatic.
Depending on the condition and type of exterior, professional correction may restore:
- Deeper original color
- Significantly improved gloss
- Clearer reflections
- A smoother, more uniform appearance
- Reduced chalkiness
- Reduced haze and cloudiness
- A more consistent finish from panel to panel
- A dramatically newer-looking overall appearance
However, oxidation removal has limits.
Some RV exteriors are simply oxidized and highly correctable. Others may have failing clear coat, extremely thin material, permanent staining, deteriorated graphics, cracks, checking, previous repair defects, or damage that polishing cannot safely eliminate.
That is why inspection matters.
Our objective is not to promise that every RV can be returned to factory-new condition. Our objective is to determine what can be safely restored and then perform the correction process required to achieve the best practical result.
DIY RV Oxidation Removal vs. Professional RV Detailing
It is possible for an experienced owner to perform some level of RV correction themselves, but severe oxidation is a much larger project than many people expect.
The equipment is only part of the equation.
Professional results depend heavily on technique:
- Choosing the appropriate compound
- Choosing the appropriate pad
- Keeping pads clean and effective
- Controlling section size
- Maintaining consistent machine movement
- Using overlapping passes
- Knowing when a section needs another correction cycle
- Recognizing when to stop
- Refining after heavy correction
- Properly preparing the surface for protection
The sheer size of an RV magnifies small technique problems.
A minor inconsistency on a two-foot section of a car hood might be difficult to notice. Repeated dozens of times across a 35- or 40-foot RV, that same inconsistency can become extremely visible.
This is why patience and process matter so much.
The Detail Genius Difference: We Don't Rush Oxidation Correction
There are faster ways to make an RV temporarily look shinier.
Our oxidation-restoration process is designed around a different objective: consistent correction across the entire RV.
We wash the RV thoroughly.
We inspect the exterior.
We test the surface.
We work in controlled sections.
We compound with professional equipment.
We make multiple passes.
We inspect.
We repeat the correction when necessary.
We polish the restored finish.
And when the surface is ready, we protect it with a graphene ceramic coating.
It is a labor-intensive process, but that is exactly what years of oxidation can require.
Frequently Asked Questions About RV Oxidation Removal
Can you remove years of oxidation from an RV?
In many cases, yes. Even severe oxidation can sometimes be dramatically improved through repeated machine compounding and polishing. The final result depends on the RV's exterior material, condition, remaining correctable surface, and whether there is additional damage such as clear-coat failure.
How long does RV oxidation removal take?
It depends on RV size and condition. Severe restoration projects can require up to 50 man-hours because we correct the RV in small sections and may perform multiple compounding passes before polishing and protection.
Why do you work in such small sections?
We typically work in approximately 18 x 24-inch areas because it gives us better control over the correction process. Trying to compound huge areas at once can lead to inconsistent correction, streaking, haze, and blemishes.
What compound do you use for heavy RV oxidation?
For appropriate heavy-correction jobs, we use Meguiar's M110 Ultra Pro Speed Compound with professional machine-polishing equipment and wool cutting pads.
Learn more: Meguiar's M110 Ultra Pro Speed Compound
What polisher do you use?
Our correction process uses Maxshine dual-action polishing equipment. DA polishers allow controlled machine correction while we work through the RV section by section.
Learn more: Maxshine Dual Action Polishers
Why use wool pads?
Wool cutting pads provide the cutting ability needed for aggressive defect and oxidation removal on suitable surfaces. Maxshine specifically lists oxidation among the defects its natural wool cutting pads are designed to address.
Learn more: Maxshine Wool Cutting Pads
Do you polish after compounding?
Yes. Compounding handles the heavier correction. Polishing is then used to refine the corrected surface and maximize clarity, color depth, and gloss.
Do you protect the RV afterward?
Yes. After correction and polishing, we apply an Ethos graphene ceramic coating as the final protective stage of our RV detailing process.
How long will the oxidation stay away?
For our service, we target at least 12–18 months of protection after correction and coating. Actual longevity varies with storage conditions, UV exposure, weather, washing, maintenance, and the underlying condition of the RV.
Is RV oxidation removal the same as waxing?
No. Waxing primarily adds temporary protection and gloss. Oxidation removal is a mechanical correction process designed to remove degraded surface material before the finish is polished and protected.
Is Your RV Faded, Chalky, or Severely Oxidized?
If washing your RV no longer brings back its shine, the problem may not be dirt.
It may be oxidation.
Detail Genius provides professional RV detailing and RV oxidation removal designed to restore faded, chalky, weathered exterior surfaces through a meticulous multi-stage correction process.
We don't try to correct an entire motorhome in a few oversized passes. We break the exterior into manageable sections, work each section repeatedly when necessary, polish the corrected surface, and protect the finished RV with graphene ceramic coating.
The process can require dozens of hours.
But when years of oxidation have robbed an RV of its color and gloss, doing the job correctly is what makes the difference.
Schedule an RV Oxidation Assessment With Detail Genius
If your motorhome, fifth wheel, travel trailer, or RV has lost its shine, contact Detail Genius to discuss professional RV detailing and oxidation removal.
A severely faded RV may still have significantly more color and gloss waiting underneath the oxidation than you think.
Detail Genius
Call: 509-423-8266
Website: DetailGenius.com
Ready to Transform Your Vehicle?
Book professional mobile detailing, RV oxidation removal, or graphene ceramic coating with Detail Genius today.